Imagine this scenario: It’s 4:30 PM on a Friday. Your team has just finished terminating a batch of 500 custom wire harnesses for a key automotive client. The specs were strict: every cable marker must be protected but perfectly legible. You used the “economical” clear heat shrink tube you found online to save 15% on BOM costs.
The QC manager picks up the first cable. She frowns. She picks up the second. Then she walks over to your desk and drops them.
“I can’t read the barcodes,” she says. “The tubing turned milky.”
Your stomach drops. You grab the cable. Sure enough, what looked like clear glass in the bag has turned into a cloudy, semi-opaque mess after heating. The entire batch is rejected. You’re not saving money anymore; you’re losing a client.
I’ve been in this industry for over 15 years, and I’ve seen this horror story play out more times than I care to count. Clear heat shrink tube is deceptively simple. It looks like a commodity, but buying it wrong is a minefield of potential failures.
This isn’t a textbook on polymer science. This is a battle-tested field guide on how not to screw up your next project. Here are the 7 critical mistakes buyers make, and how to avoid them.
Mistake #1: Buying on Price Instead of Clarity (The “Yellowing” Trap)
The biggest misconception in the market is that “clear is clear.” It isn’t.
Cheap manufacturers save money by using low-grade recycled resins or unstable cross-linking agents. In the bag, the tubing looks fine. But as soon as you apply heat—the very thing it’s designed for—chemical reactions occur.
- The Symptom: The tube turns yellow, amber, or cloudy (milky) upon recovery.
- The Cause: Oxidation of impurities in the resin or lack of UV stabilizers.
- The Cost: Re-work, scrapped product, and inability to perform visual inspections.
Pro-Tip: If the price seems too good to be true, it’s probably “Regrind” (recycled material). Virgin resin costs money. For critical applications where you need to scan a barcode through the tube, you cannot afford the cheapest option.
Mistake #2: The “Flat Width” vs. “Diameter” Sizing Blunder
I once had a purchasing manager order 10,000 meters of tubing that was useless because he confused Flat Width with 直径.
Large heat shrink is often shipped flat on a spool. If you measure it flat with a ruler, you are measuring half the circumference, not the diameter.
- The Math: Diameter = Flat Width × 2 ÷ 3.14 (Pi).
- The Analogy: It’s like buying pants. If you measure the waist of your jeans lying flat on the bed, it might say 16 inches. If you buy a belt that is 16 inches long, it won’t fit around your 32-inch waist.
Action: Always specify Inner Diameter (ID) when ordering. It is the universal standard.
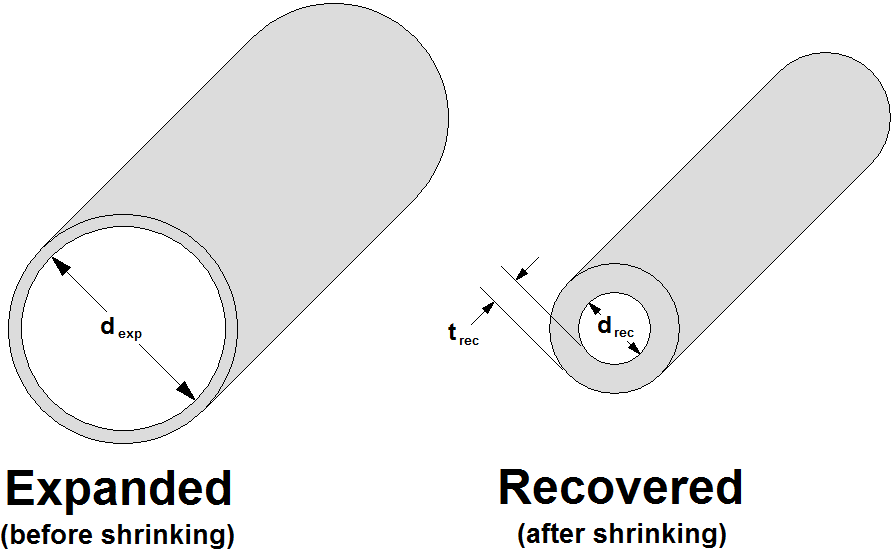
Mistake #3: Ignoring the “Pass-Through” Clearance
This is the classic rookie engineering mistake. You measure the wire bundle diameter (say, 5mm) and order a 6.4mm tube. Perfect fit, right?
Wrong. You forgot about the connector at the end of the wire.
If your tubing has to slide over a bulky Deutsch connector or a ring terminal to get to its final position, your Expanded ID needs to be large enough to clear that hurdle.
The Rule of Thumb:
- Big enough to slide on: Expanded ID > Largest component (Connector).
- Small enough to grip: Recovered ID < Smallest component (Wire Bundle).
If the difference between the connector and the wire is huge, a standard 2:1 shrink ratio won’t work. You’ll need a 3:1 or 4:1 high-ratio tube.
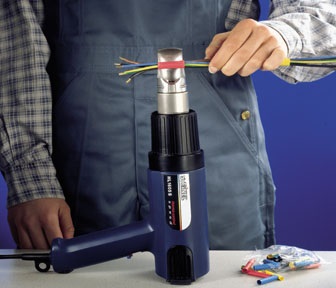
Mistake #4: Using the Wrong Heating Tools (Lighters are for Smokers)
I cringe every time I see a technician shrinking tubing with a cigarette lighter.
Clear heat shrink tube is unforgiving. Unlike black tubing, which hides sins, clear tubing shows everything.
- Lighters/Torches: Leave soot deposits (carbon) inside the clear plastic. You end up with a dirty, smoky look that ruins the aesthetic. They also cause localized overheating, leading to bubbles.
- The Bubble Problem: If you heat too aggressively without letting air escape, you trap air pockets between the tube and the wire. In clear tubing, these look like ugly blisters.
The Fix: Use a heat gun with a reflector nozzle. It distributes heat evenly around the circumference.
Mistake #5: Overlooking Environmental Compatibility (UV & Cold)
Standard clear Polyolefin has a weakness: UV light. Without specific additives, it can become brittle and crack if left out in the sun for months.
Conversely, standard PVC (often sold as the “clearest” option) gets rock-hard in freezing temperatures. If your product is a cable harness for a snowplow, clear PVC will shatter like glass when the vehicle hits a bump at -20°C.
Buyer’s Check:
- Outdoors? Avoid standard PVC; look for UV-stabilized materials.
- Freezing Cold? Avoid PVC; look for EVA or high-grade Polyolefin.
Mistake #6: Not Testing a Sample First
Datasheets are marketing documents with numbers. They don’t tell you the “feel” of the product.
- Does it feel sticky or tacky after shrinking? (Common in cheap adhesive-lined tubes).
- Does it have a blue tint or a yellow tint?
- Does the printing on your label bleed into the adhesive?
Never commit to a production run without physically shrinking a sample over your exact assembly. WILLELE offers sample kits precisely for this reason.
Mistake #7: Poor Vendor Selection Criteria
Are you buying from a vendor who just moves boxes, or one who understands applications?
Ask your potential supplier this question: “What happens to the clarity of your tubing if I shrink it at 110°C versus 90°C?”
If they can’t answer, run. A knowledgeable partner knows that clear heat shrink often requires lower shrink temperatures to maintain maximum transparency.
The Smart Buyer’s Checklist
Before you sign that Purchase Order, run through this quick checklist to protect your investment.
| Consideration | The “Quality” Choice (What you want) | The “Risky” Choice (What to avoid) |
|---|---|---|
| Material Base | Virgin Resin (Consistent clarity) | Recycled/Regrind (Inconsistent, hazing) |
| Sizing Method | Specified by Inner Diameter (ID) | Specified by Flat Width (Confusing) |
| 収縮率 | Matched to substrate (e.g., 3:1 for connectors) | “One size fits all” 2:1 (Loose fit) |
| Clarity | Crystal Clear (Glass-like) | Translucent / Milky / Hazy |
| Temperature | Flexible at low temp (-30°C to -50°C) | Brittle/Cracks below 0°C |
| ドキュメンテーション | Full Spec Sheet + Certs | “Standard” generic description |
The WILLELE EVA Advantage: Solving the Common Problems
At WILLELE, we saw these mistakes happening constantly, which is why we focused our development on EVA (Ethylene Vinyl Acetate) materials.
Why EVA? Because it solves the most annoying problems of standard clear tubing:
- It Solves the “Haze”: EVA has superior optical clarity compared to standard polyolefin. It doesn’t look milky; it looks like glass.
- It Solves the “Cracking”: Unlike PVC, our EVA remains flexible down to -30°C. It’s tough, not brittle.
- It Solves the “Burn”: EVA has a lower shrink temperature (70-100°C) than many other plastics. This means you can shrink it faster with less heat, significantly reducing the risk of scorching or yellowing the tube during installation.
It is the “Goldilocks” material for technicians—tough enough for protection, clear enough for inspection, and forgiving enough to install easily.
Installation Best Practices: Step-by-Step
Don’t let a bad install ruin a good product. Follow these steps for a perfect, invisible finish.
Step 1: Clean Your Substrate
Any grease, oil, or fingerprint on the wire under the tube will be magnified once the tube shrinks. Wipe it down.
Step 2: Position & Center
Slide the tube in place. Ensure you have overlap on both sides of the splice or marker.
Step 3: Heat from the Center Out
This is the most critical step. Start heating in the middle of the tube. Rotate the wire (or the gun). Once the middle grips, slowly work your way toward the ends.
- Why? This forces air out the ends. If you shrink the ends first, you trap air in the middle, creating ugly bubbles.
Step 4: Cool Down
Don’t touch it! Clear tubing is soft when hot. If you squeeze it now, you’ll leave a permanent fingerprint impression in the plastic, ruining the clarity. Let it cool for 30 seconds.
Frequently Asked Questions (Buyer’s Edition)
Q: I have a label that measures 10mm wide. What size tube do I need?
A: Don’t guess. Measure the 直径 of the cable with the label on it. Then add 20%. If the diameter is 6mm, buy a 9.5mm or 12mm tube. You want it to slide on easily without snagging the label corners.
Q: Can I print directly onto clear heat shrink tube?
A: Yes, but it requires specific ribbon types (usually resin-based). However, the most common application is “Reverse Printing” (printing on the wire/label and using the clear tube as a protective overlay). This is more durable as the ink is protected under the plastic.
Q: My clear tubing has text printed on it (specs). Can I remove it?
A: Most industrial tubing comes with spec printing. If you need a purely clear window (e.g., for aesthetics), you must specify “Unmarked” or “No Print” when ordering from WILLELE. We stock both.
Q: Is adhesive-lined (dual wall) clear tubing worth the extra cost?
A: If moisture is a concern, absolutely. The adhesive melts and fills the gaps, creating a waterproof seal. It also makes the tube slightly more rigid. If you just need identification protection inside a control panel, standard single-wall is sufficient and cheaper.
Q: How do I store clear heat shrink?
A: Keep it below 30°C and out of direct sunlight. High heat can cause “preshrinking” on the spool, and UV can degrade the clarity over long storage periods.
Don’t let a $0.10 piece of plastic ruin a $1000 assembly. By avoiding these common mistakes and choosing a reliable material like WILLELE’s EVA, you ensure your project remains secure, professional, and crystal clear for years to come.
Ready to test the difference? Contact WILLELE today for a sample pack of our High-Clarity EVA tubing.