Introntroduction
Implementing best practices for heat shrink tubing installation in industrial settings is critical for ensuring long-lasting electrical connections, equipment reliability, and workplace safety. As industrial operations become increasingly complex and demanding, proper heat shrink tube application has evolved from a simple task to a precision-critical procedure that directly impacts system performance and operational uptime. willele Electric, a leading B2B manufacturer of specialized heat shrink tubing solutions, has compiled this comprehensive guide to help industrial professionals achieve optimal installation results across diverse applications.
Heat shrink tubing failures in industrial environments can lead to costly downtime, equipment damage, and safety hazards. This guide covers essential preparation techniques, installation methodologies, quality control measures, and troubleshooting strategies that industrial electricians, maintenance technicians, and engineers need to master for successful heat shrink tubing implementation.
熱収縮チューブとは?
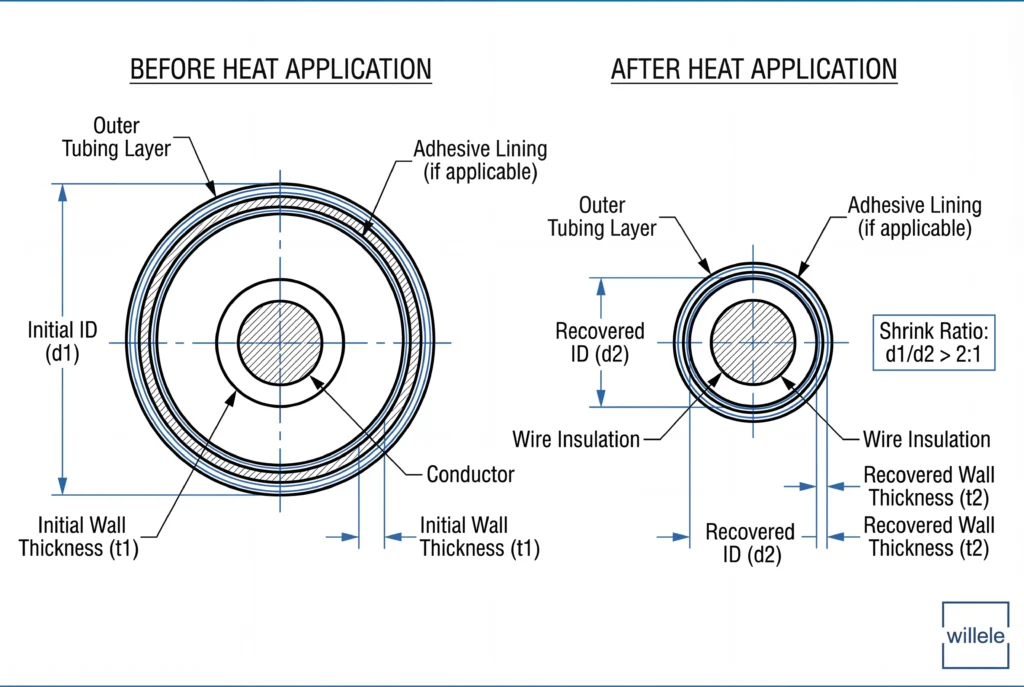
Heat shrink tubing is a specialized polymer-based insulation material designed to shrink radially when exposed to elevated temperatures. Manufactured from materials such as polyolefin, PVC, fluoropolymers, or elastomers, heat shrink tubes provide electrical insulation, mechanical protection, strain relief, and environmental sealing for wire connections, cable terminations, and component assemblies.
When heated to its activation temperature, the tubing’s molecular structure contracts uniformly, conforming tightly to the underlying substrate. Modern industrial-grade heat shrink products feature predetermined shrink ratios (typically 2:1, 3:1, or 4:1), enabling precise fitting over irregular geometries while maintaining consistent wall thickness after shrinkage.
Why Proper Installation Matters in Industrial Settings
Industrial environments present unique challenges that magnify the importance of proper heat shrink tubing installation:
Electrical Reliability: Improper installation can create gaps, air pockets, or incomplete coverage that compromise dielectric strength and allow moisture ingress, leading to short circuits, arcing, or ground faults in high-voltage systems.
Mechanical Durability: Industrial equipment experiences vibration, mechanical stress, and physical abrasion. Poorly installed heat shrink fails to provide adequate strain relief, resulting in premature wire fatigue and connection failure.
環境保護: Manufacturing facilities expose electrical systems to chemicals, oils, solvents, temperature extremes, and humidity. Inadequate installation compromises the environmental seal, accelerating insulation degradation and corrosion.
Safety Compliance: Industrial safety standards (OSHA, NEC, IEC) require proper electrical insulation. Substandard installations create shock hazards and fire risks, potentially leading to regulatory violations and liability issues.
Cost Impact: Equipment downtime in industrial settings costs thousands of dollars per hour. Preventing failures through proper installation delivers significant ROI compared to reactive maintenance and emergency repairs.
Pre-Installation Best Practices
素材の選択
Selecting appropriate heat shrink tubing requires careful consideration of application-specific requirements:
| Selection Criteria | Considerations | Recommended Options |
|---|---|---|
| Operating Voltage | Insulation breakdown strength, dielectric constant | Low voltage (<600V): Standard polyolefin; High voltage (>1kV): Cross-linked materials |
| 温度範囲 | Continuous operating temperature, heat exposure | -55°C to +135°C: Polyolefin; -55°C to +175°C: Fluoropolymer; -40°C to +200°C: Silicone |
| Environmental Exposure | Chemical resistance, UV stability, moisture | Harsh chemicals: Kynar/PVDF; Outdoor: UV-stabilized polyolefin; Marine: Adhesive-lined |
| Mechanical Stress | Abrasion resistance, flexibility requirements | High abrasion: Heavy-wall polyolefin; Flexible applications: Elastomeric materials |
| 収縮率 | Substrate size variation, irregular shapes | Regular wires: 2:1 ratio; Connectors/splices: 3:1 or 4:1 ratio |
Surface Preparation
Proper substrate preparation ensures optimal adhesion and performance:
- クリーニング: Remove all contaminants (oil, grease, dust, oxidation) using appropriate solvents or cleaning agents. Allow complete drying before tube application.
- Inspection: Examine conductors and connections for damage, corrosion, or defects that could compromise performance.
- Wire Stripping: Use precision stripping tools to remove insulation without nicking conductors. Maintain consistent strip lengths for uniform coverage.
- Connection Quality: Verify mechanical and electrical integrity of splices, crimps, or solder joints before applying heat shrink protection.
Step-by-Step Installation Process
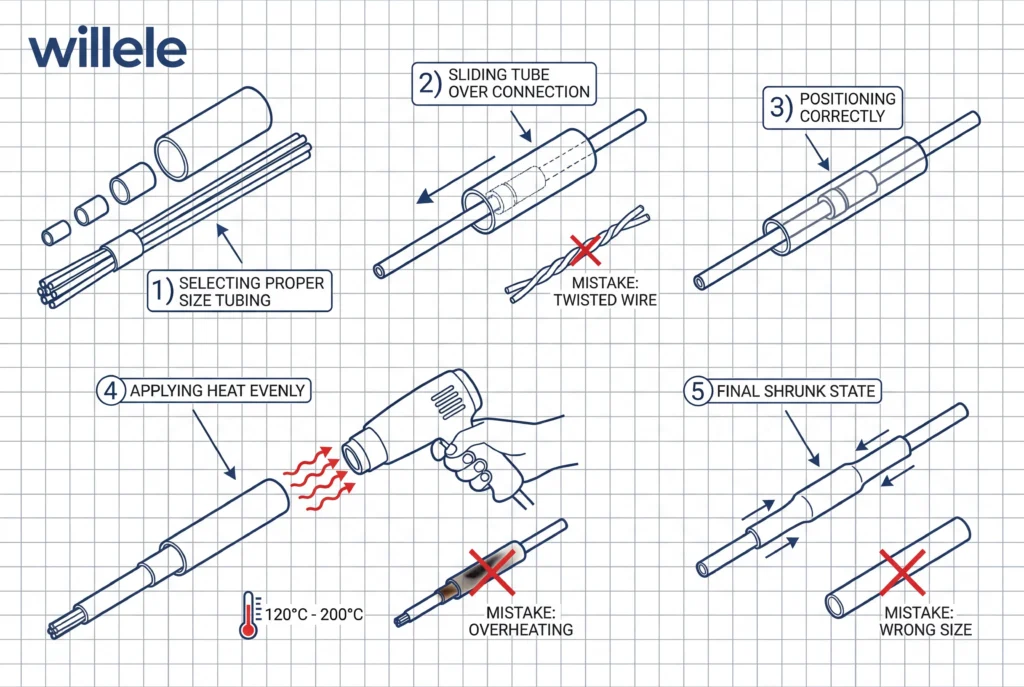
Phase 1: Sizing and Positioning
Step 1: Select tubing with recovered diameter 20-30% smaller than the substrate diameter to ensure tight fit without excessive stress.
Step 2: Cut tubing to appropriate length, allowing 6-12mm overhang beyond the connection point on each side for complete coverage.
Step 3: Slide tubing onto wire before making connections (critical for inline splices). Position tubing away from the work area during soldering or crimping to prevent premature shrinkage.
Phase 2: Heat Application
Step 4: Position heat shrink tubing centered over the connection with equal overhang on both ends.
Step 5: Apply heat uniformly using an appropriate heat source (heat gun, oven, or torch) starting from the center and working toward the ends. This technique prevents air entrapment.
Step 6: Rotate the assembly continuously during heating to ensure 360-degree uniform shrinkage. Maintain recommended standoff distance (typically 25-50mm for heat guns).
Step 7: Continue heating until tubing conforms completely to the substrate, with no wrinkles, bubbles, or gaps visible. For adhesive-lined tubing, verify adhesive melt-out at tube ends.
Phase 3: Cooling and Verification
Step 8: Allow tubing to cool naturally without forced cooling, which can cause internal stresses and dimensional instability.
Step 9: Inspect installation for complete shrinkage, uniform appearance, and proper adhesive seal (if applicable).
Critical Installation Parameters
Understanding and controlling key installation parameters ensures consistent, reliable results:
| Parameter | Standard Polyolefin | High-Temp Polyolefin | Fluoropolymer (Kynar) | 粘着裏地付き |
|---|---|---|---|---|
| Shrink Temperature | 90-120°C | 110-150°C | 175-200°C | 90-120°C (tubing) + adhesive activation |
| 収縮率 | 2:1 or 3:1 | 2:1 | 2:1 or 4:1 | 3:1 or 4:1 typical |
| Longitudinal Shrinkage | 5-10% | 5-8% | <5% | 8-15% |
| Recovery Time | 30-90 seconds | 45-120 seconds | 60-180 seconds | 60-150 seconds |
| Operating Temperature | -55°C to +125°C | -55°C to +150°C | -55°C to +175°C | -55°C to +110°C |
| Wall Thickness (recovered) | 0.3-1.5mm | 0.4-2.0mm | 0.2-0.8mm | 0.5-2.5mm |
| 絶縁耐力 | 15-20 kV/mm | 18-23 kV/mm | 20-30 kV/mm | 12-18 kV/mm |
Critical Notes:
- Never exceed maximum shrink temperature, which can cause material degradation, discoloration, or loss of physical properties
- Insufficient heating results in incomplete recovery, poor conformance, and inadequate mechanical protection
- Heat application speed affects final properties; rapid heating can cause uneven shrinkage or surface blistering
Common Installation Mistakes to Avoid
| Mistake | Consequences | Prevention Strategy |
|---|---|---|
| Undersizing tubing | Excessive tension, splitting, thinned walls | Follow manufacturer’s sizing guidelines; allow 20-30% clearance |
| Oversizing tubing | Loose fit, gaps, poor environmental seal | Calculate recovered diameter accurately; use higher shrink ratios for irregular shapes |
| Overheating | Material charring, brittleness, loss of flexibility | Use temperature-controlled heat sources; monitor surface appearance |
| Uneven heating | Wrinkles, bridging, incomplete shrinkage | Rotate assembly continuously; maintain consistent heat gun distance |
| Air entrapment | Voids reducing dielectric strength | Heat from center outward; puncture tube before shrinking if needed |
| Insufficient overlap | Exposed connections, moisture ingress | Ensure minimum 6mm overhang beyond connection points |
| Heating before positioning | Premature shrinkage, installation impossible | Slide tubing onto wire before making connections |
| Forced cooling | Internal stresses, dimensional instability | Allow natural cooling to ambient temperature |
Tools and Equipment Requirements
Professional heat shrink installation requires appropriate tools and equipment:
| Equipment Category | Tool/Equipment | Application | Key Specifications |
|---|---|---|---|
| Heat Sources | Industrial heat gun | General purpose, field installation | Variable temperature (100-650°C), adjustable airflow |
| Bench-top hot air station | Precision work, small components | Digital temperature control, interchangeable nozzles | |
| Convection oven | High-volume production, uniform heating | Temperature uniformity ±5°C, programmable cycles | |
| Flameless torch | Field applications, large diameter tubing | Butane/propane fuel, heat reflector attachment | |
| Measurement Tools | Digital calipers | Diameter verification, sizing | 0.01mm resolution, inside/outside measurement |
| Infrared thermometer | Surface temperature monitoring | -50°C to +500°C range, adjustable emissivity | |
| Megohmmeter (megger) | Insulation resistance testing | 500-5000V test voltage capability | |
| Cutting Tools | Tubing cutter | Clean, square cuts | Ratcheting mechanism, deburring blade |
| Cable knife | Wire preparation | Precision stripping without conductor damage | |
| Support Equipment | Wire holding fixtures | Hands-free positioning | Adjustable, heat-resistant construction |
| Heat-resistant gloves | Safety during installation | Temperature rating >200°C, dexterity preserved |
willele Electric manufactures heat guns and application equipment specifically designed for optimal heat shrink tubing installation in industrial environments.
Quality Control and Testing
Visual Inspection Criteria
Post-installation inspection should verify:
- Complete shrinkage with no bridging or loose sections
- Uniform appearance without wrinkles, blisters, or discoloration
- Proper coverage with adequate overhang beyond connection points
- Adhesive seal (for adhesive-lined types) with visible melt-out at tube ends
- No mechanical damage such as cracks, tears, or punctures
Electrical Testing
Critical applications require electrical verification:
Insulation Resistance Testing: Apply test voltage (typically 500-1000V DC) between conductor and ground, measuring resistance. Acceptable values exceed 100 MΩ for most industrial applications.
Dielectric Withstand Testing: Apply AC voltage (typically 2x operating voltage + 1000V for 60 seconds) to verify insulation integrity without breakdown.
Continuity Verification: Confirm electrical connections maintain proper conductivity after heat shrink application.
Mechanical Testing
For high-reliability applications, perform:
- Pull testing to verify strain relief adequacy
- Flexure testing for dynamic applications
- Environmental exposure simulation (temperature cycling, humidity, chemical exposure)
Industry-Specific Applications
Automotive and Transportation
Vehicle electrical systems require vibration-resistant, temperature-stable connections. Use adhesive-lined, cross-linked polyolefin heat shrink with 3:1 or 4:1 shrink ratios for engine compartment applications. Operating temperature range: -40°C to +150°C.
Oil and Gas
Harsh chemical exposure and extreme temperatures demand fluoropolymer or specialty elastomer heat shrink materials. Explosion-proof installation procedures and flame-retardant materials are mandatory. Applications include downhole instruments, pipeline monitoring, and offshore platform wiring.
Manufacturing and Automation
Robotic systems and automated equipment require flexible, abrasion-resistant heat shrink for cable management in continuous-flex applications. Color-coding facilitates circuit identification during maintenance.
Renewable Energy
Solar inverters and wind turbine electrical systems operate outdoors with UV exposure and wide temperature fluctuations. UV-stabilized, adhesive-lined heat shrink provides long-term environmental protection for critical connections.
電気通信
Data center and telecommunications infrastructure requires low-smoke, zero-halogen (LSZH) heat shrink materials for fire safety compliance. EMI-shielding heat shrink protects high-frequency signals from interference.
安全への配慮
Heat Source Hazards
- Maintain minimum clearances from flammable materials (minimum 300mm)
- Never direct heat guns toward personnel or heat-sensitive components
- Allow heat tools to cool completely before storage
- Use appropriate PPE including heat-resistant gloves and safety glasses
Ventilation Requirements
Heat shrink materials can release fumes during application, particularly fluoropolymers and adhesive-lined types. Ensure adequate ventilation in enclosed spaces. Use local exhaust ventilation for high-volume production environments.
Electrical Safety
- De-energize circuits before installing heat shrink on live electrical systems
- Verify proper voltage ratings before selecting heat shrink materials
- Follow lockout/tagout procedures for industrial equipment
- Test insulation resistance before re-energizing systems
Ergonomic Considerations
Repetitive heat gun use can cause fatigue and strain injuries. Use adjustable fixtures to position work at comfortable heights, take regular breaks, and rotate tasks to prevent repetitive motion injuries.
結論
Mastering best practices for heat shrink tubing installation in industrial settings requires understanding material properties, precise technique execution, and rigorous quality control. By following the preparation guidelines, installation procedures, and testing protocols outlined in this guide, industrial professionals can achieve reliable, long-lasting electrical connections that withstand demanding operational environments.
willele Electric remains committed to supporting industrial customers with high-quality heat shrink tubing products, application equipment, and technical expertise. Proper installation not only ensures immediate system reliability but also reduces long-term maintenance costs and enhances workplace safety.
Investing time in proper training, using appropriate tools, and implementing systematic quality control procedures transforms heat shrink tubing installation from a routine task into a precision operation that delivers measurable value across industrial applications.
Frequently Asked Questions
Q: What shrink ratio should I choose for industrial applications?
A: Select shrink ratio based on substrate geometry. Use 2:1 for uniform diameter wires and cables, 3:1 for moderate size variations or small connectors, and 4:1 for irregular shapes, large connectors, or transitions between significantly different diameters. Higher shrink ratios provide greater flexibility but may have thinner recovered walls.
Q: How do I prevent air bubbles during heat shrink installation?
A: Always heat from the center of the tubing toward the ends, allowing trapped air to escape. For long sections, puncture a small hole near the center before heating to provide an air escape path. Rotate the assembly continuously during heating to ensure uniform shrinkage and eliminate wrinkles that trap air.
Q: Can I reuse or remove heat shrink tubing after installation?
A: No. Heat shrink tubing undergoes irreversible molecular changes during shrinkage and cannot be restored to its original dimensions. Removal requires cutting and discarding the tubing. Always verify proper sizing and positioning before heat application to avoid waste.
Q: What temperature should I use for heat shrink installation?
A: Use the manufacturer’s specified shrink temperature range, typically 90-120°C for standard polyolefin, 110-150°C for high-temperature polyolefin, and 175-200°C for fluoropolymer materials. Set industrial heat guns to 150-200°C for most polyolefin applications, maintaining 25-50mm standoff distance to prevent overheating.
Q: How much should heat shrink tubing overlap connections?
A: Provide minimum 6mm (0.25 inch) overlap beyond the connection or splice point on each end. For critical applications or harsh environments, extend overlap to 12-25mm to ensure complete environmental sealing. Account for 5-15% longitudinal shrinkage when cutting tubing to length.
Q: When should I use adhesive-lined heat shrink tubing?
A: Use adhesive-lined heat shrink for applications requiring environmental sealing against moisture, chemicals, or contaminants. The internal adhesive layer melts during heating, creating a waterproof seal. Essential for outdoor installations, marine environments, underground applications, and any situation where moisture ingress could cause corrosion or electrical failure.