
Ask any maintenance engineer what actually costs a plant money, and the answer is rarely the conductor. It is the connection. Cable splices, crimped lugs, motor terminations, and terminal block joints are the weak points in every electrical system, and the small thermoplastic sleeve that protects them, the heat shrink tube, quietly determines whether a connection survives a maintenance cycle or fails at the worst possible moment. For industrial facilities across North America, Europe, and the Middle East, heat shrink tubing is not an optional accessory but a standard part of preventive maintenance practice, because it insulates, seals, and mechanically reinforces every joint it covers in minutes and at a fraction of the cost of an unplanned outage.
At WILLELE Electric, a B2B manufacturer of electrical components and wiring accessories, heat shrink tubes are engineered for the real conditions of a plant floor: vibration, washdown, chemical vapor, and thermal cycling. This guide is written for maintenance teams, panel builders, and facility engineers who want to understand what heat shrink tubes do, how to select the right type and size, and how to install them so a repair stays repaired. Search for “heat shrink tubes” and you will find a commodity; specify them the way this guide describes, and you get a reliability upgrade.
Why Heat Shrink Tubes Matter in Industrial Maintenance
Connections fail for predictable reasons. Moisture tracks along a stripped conductor and corrodes the copper. Vibration at a motor or pump loosens and abrades a splice. Abrasion against a cabinet edge wears through insulation until phase-to-phase contact occurs. Thermal cycling, heating and cooling thousands of times, works stress into a joint that was never mechanically supported. Each of these failure modes is accelerated by exposure, and each is addressed directly by a correctly installed heat shrink tube.
Heat shrink tubing responds to all four threats at once. It restores dielectric insulation across a stripped area, so the connection no longer relies on factory cable insulation that was cut away. It adds a tough outer wall that shrugs off abrasion and physical impact. On adhesive-lined grades, it forms an environmental seal that keeps moisture, dust, and corrosive gases away from the metal. And because the shrunken tube grips the substrate tightly, it provides mechanical strain relief that protects soldered and crimped joints from fatigue.
The economics matter too. A single heat shrink tube costs cents; the labor to replace a failed motor connection in the middle of a production shift costs hundreds of times more, before counting lost output. Preventive maintenance programs that include heat shrink tubing as a standard repair step routinely cut connection-related callouts, which is why OEMs and plant maintenance teams alike treat tube selection as a technical decision rather than a commodity purchase.
How Heat Shrink Tubes Work
A heat shrink tube is a thermoplastic sleeve, usually cross-linked polyolefin, PVC, or a fluoropolymer, manufactured in an expanded state so that its inner diameter is deliberately larger than the cable or splice it will cover. When heated with a heat gun or an infrared tool, the polymer’s cross-linked molecular structure, set during manufacturing through electron-beam or chemical cross-linking, drives the material back toward its original extruded diameter. The tube contracts radially, typically to half or a quarter of its expanded size, gripping the joint tightly and conforming to irregular shapes such as crimped lugs and stepped cable diameters.
The cross-section below shows what happens at the joint before and after recovery. Before heating, the tube slides easily over the stripped cable and connector. As heat is applied evenly, the outer wall shrinks while the inner hot-melt adhesive liner, on dual-wall products, melts and flows, filling any gaps around the splice and bonding to the cable jacket. The result is a sealed, insulated, mechanically reinforced connection.
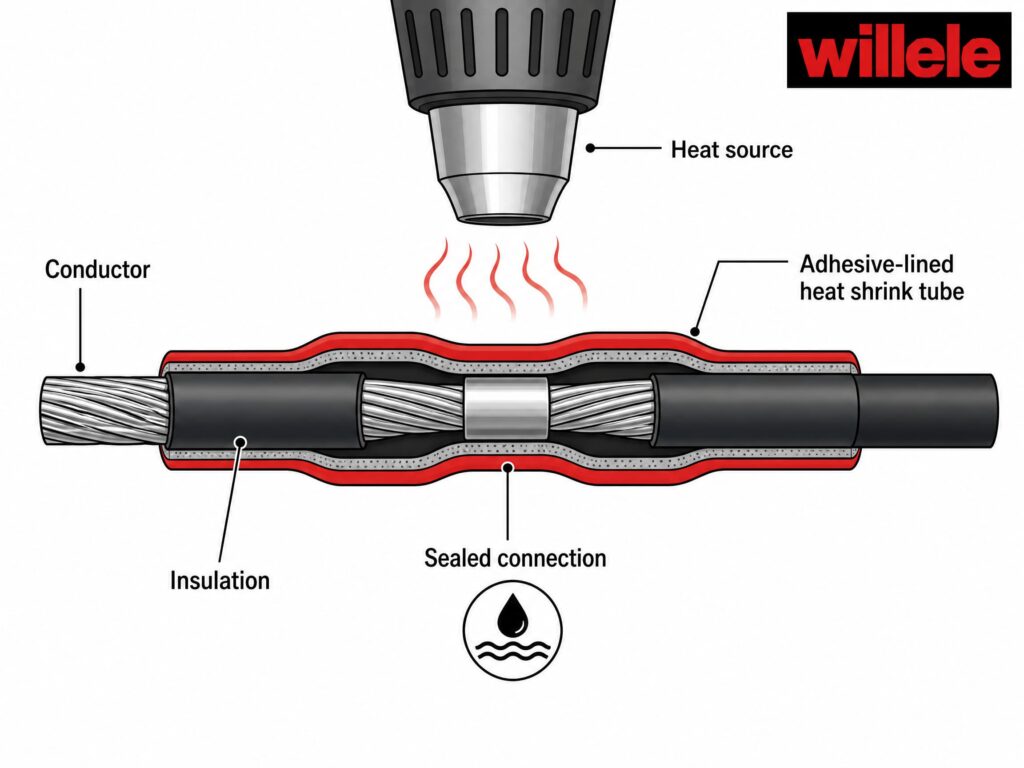
Annotated cross-section of a heat shrink tube applied over a cable joint: the adhesive-lined tube recovers under heat to form a sealed, insulated connection.
Heat Shrink Tube Material Types and How They Compare
Not every heat shrink tube belongs in an industrial maintenance kit. Material chemistry determines temperature range, chemical resistance, and toughness, and selecting the wrong grade is a common cause of premature insulation failure on a plant floor.
| Material | Temp. Range | Shrink Ratio | Key Strength | Best Maintenance Use |
|---|---|---|---|---|
| Polyolefin | -55°C to 135°C | 2:1 to 3:1 | Balanced cost, flexibility, insulation | General panel wiring, splices, motor terminations |
| PVC | -20°C to 85°C | 2:1 | Low cost, easy handling | Light-duty indoor bundling and color coding |
| Fluoropolymer (FEP/PVDF) | -55°C to 175°C+ | 2:1 to 4:1 | Chemical and high-heat resistance | Chemical plants, high-temperature equipment |
| Dual-Wall Adhesive-Lined | -40°C to 125°C | 3:1 to 4:1 | Environmental sealing, strain relief | Outdoor switchgear, wet or buried connections, marine |
Polyolefin remains the default for most maintenance work because it holds dielectric strength well above 15 kV/mm while staying flexible enough for tight cabinet routing. Fluoropolymer costs more but earns its price where solvents or continuous high temperature are present. Dual-wall adhesive-lined tubing is the standard for anything installed outdoors or exposed to washdown, since the melted adhesive closes gaps that single-wall tubing cannot.
Single-Wall vs. Dual-Wall Heat Shrink Tubes
Beyond material, the tube’s construction, single-wall versus dual-wall, determines whether a connection is simply insulated or fully sealed against the environment.
| Feature | Single-Wall Heat Shrink | Dual-Wall (Adhesive-Lined) Heat Shrink |
|---|---|---|
| Structure | One layer of cross-linked polymer | Outer polymer wall + inner hot-melt adhesive liner |
| Primary function | Insulation, color coding, bundling | Insulation plus moisture and chemical sealing |
| Environmental sealing | Minimal; gaps possible at tube ends | Full seal once adhesive flows at both ends |
| Typical setting | Dry indoor panels and harnesses | Outdoor enclosures, underground vaults, washdown areas |
| Relative cost | Lower | Moderate to higher |
| Installation care | Standard heat gun pass | Requires full adhesive wet-out for a proper seal |
Facility engineers working on outdoor substations, wind turbine nacelles, or dockside equipment consistently move to dual-wall construction, because a single-wall tube left with an open end at a splice will eventually let condensation track along the conductor. Indoors, in a climate-controlled control room, single-wall polyolefin is usually sufficient and more economical at volume.
Shrink Ratios: 2:1, 3:1, or 4:1?
The shrink ratio describes how much the tube contracts, and it determines how much size tolerance you gain. This is the specification that saves maintenance crews from stocking a separate tube for every cable diameter.
| Ratio | Expansion Example | Best For |
|---|---|---|
| 2:1 | 6 mm down to 3 mm | Standard splices where joint diameter is close to cable diameter |
| 3:1 | 9 mm down to 3 mm | Crimped lugs and connectors with a larger profile than the cable |
| 4:1 | 12 mm down to 3 mm | Stepped cables, awkward joints, one-size-fits-many repair kits |
A 2:1 ratio covers most standard splices. For crimped lugs or connectors noticeably larger than the cable itself, a 3:1 or 4:1 ratio accommodates the size difference without a custom-cut tube. The trade-off is a thinner finished wall at higher ratios, so confirm that the recovered wall thickness still provides adequate mechanical protection for the application.
Heat Shrink vs. Cold Shrink: Which Suits Your Repair Bay?
Maintenance crews sometimes ask whether heat is always required, which brings in the cold shrink tube: a pre-expanded sleeve held open by a removable spiral core that collapses onto the joint the moment the core is pulled out, with no heat source at all. It is a genuine alternative, but it is not interchangeable with heat shrink on every job.
| Feature | Heat Shrink Tube | Cold Shrink Tube |
|---|---|---|
| Installation | Heat gun or torch required | No heat; spiral core removed by hand |
| Adhesive lining | Available on dual-wall grades | Usually pre-lined |
| Grip and recovery | Strong, tight conforming grip | Uniform but lighter recovery force |
| Continuous temp. rating | Up to 135°C+ for polyolefin | Often limited to around 90°C |
| Cost per joint | Lower | Higher |
| Typical maintenance use | In-shop splices, panels, motors | Outdoor terminations, no-power zones, flame-restricted sites |
For most in-shop maintenance, heat shrink stays the practical default: it costs less per joint, grips harder, and tolerates higher temperatures. Cold shrink earns its place where a flame or heat gun is unsafe or impractical, such as confined vaults or near fuel lines. A well-equipped bay stocks both and chooses by the job, not by habit.
Where Heat Shrink Tubes Fit into Daily Maintenance Work
Heat shrink tubing shows up anywhere a wired connection has to survive real-world stress. Motor termination boxes are the classic case: vibration at the motor loosens insulation over time, and a correctly sized tube over each lead termination adds strain relief that varnish and tape cannot match. Control panels and machine wiring benefit from tubes on every splice, so a later fault is traceable to a protected joint rather than a naked one. In outdoor cable entries and junction boxes, dual-wall tubes seal the connection against rain and condensation, the two most common enemies of outdoor electrical reliability.
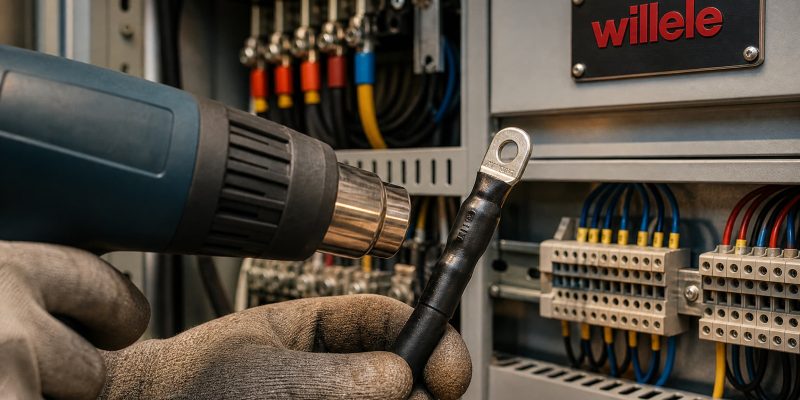
A maintenance technician shrinks a heat shrink tube over a cable-to-lug connection inside an industrial control cabinet, producing a tight, uniform seal over the joint.
Beyond these basics, heat shrink tubes protect busbar connections inside distribution cabinets where dielectric failure risks arc flash, seal splices in renewable energy arrays exposed to weather for two decades or more, and provide the flame-retardant, low-smoke performance rail and marine operators require under fire safety codes. Across every sector, the pattern is the same: the tube is cheap, the protection is permanent, and the cost of skipping it is measured in downtime.
How to Choose the Right Heat Shrink Tube Size
Sizing is the most common source of installation failure, and it is also the easiest to get right with a chart. Measure the widest point the tube must cover, usually the crimped lug or connector body, then select a tube whose expanded inner diameter clears that point while its recovered diameter is smaller than the cable jacket it must grip.
| Cable Cross-Section | Conductor Diameter | Recommended Tube (2:1) | Recovered Inner Diameter |
|---|---|---|---|
| 1.5–2.5 mm² | 1.4–2.0 mm | 3.2 mm | 1.6 mm |
| 4–6 mm² | 2.3–3.0 mm | 6.4 mm | 3.2 mm |
| 10–16 mm² | 3.6–4.6 mm | 9.5 mm | 4.8 mm |
| 25–35 mm² | 5.6–7.0 mm | 12.7 mm | 6.4 mm |
| 50–70 mm² | 8.0–10.0 mm | 19.1 mm | 9.5 mm |
When in doubt, move up a size or choose a 3:1 ratio, since a tube that is slightly large still shrinks down and grips, while a tube that is too small will not slide over the joint at all. Standard maintenance kits stocked with a small set of 2:1 and 3:1 sizes in polyolefin and dual-wall cover nearly every repair a plant floor produces.
Step-by-Step: Installing Heat Shrink Tubes Correctly
Even premium heat shrink tubing underperforms if installed poorly. A few disciplined steps separate a connection that lasts from one that fails within a year.
- Strip and clean the conductor fully before sliding the tube into place; oxidation or residual insulation under the tube compromises both the adhesive bond and the electrical seal.
- Slide the tube over one end of the cable before making the splice, so it is positioned and ready once the joint is complete.
- Size the tube so its unshrunk diameter comfortably clears the largest feature of the joint, typically the crimped lug or connector body, while still shrinking down tight against the cable jacket.
- Apply heat evenly, moving the heat gun in a steady sweeping motion rather than holding it stationary, to avoid scorching one side while leaving the opposite side under-shrunk.
- On adhesive-lined tubing, continue heating until adhesive is visibly flowing and forms a smooth fillet at both open ends, not just until the outer wall looks tight.
- Allow the tube to cool undisturbed before flexing or routing the cable, since the adhesive needs a moment to set before it can resist mechanical stress.
- Maintain a minimum overlap, generally 25 mm, onto the existing cable insulation on both sides of the splice to prevent moisture tracking at the tube’s edge.
Skipping any of these steps is a common root cause of the “mystery” connection failures that appear during preventive maintenance inspections months later, long after the original installer has moved to another job.
Common Installation Mistakes vs. Best Practice
| Mistake | Consequence | Best Practice |
|---|---|---|
| Tube too small for the joint | Will not slide over the connector | Measure widest point; size up or use 3:1 |
| Holding heat gun stationary | Scorching and uneven shrink | Sweep the heat gun continuously |
| Skipping adhesive wet-out check | Gap at tube ends, moisture ingress | Heat until adhesive fillet appears at both ends |
| Shrinking over an unclean conductor | Poor bond and corrosion | Strip and clean before installing |
| Bending the cable before cooling | Adhesive fails, tube wrinkles | Let the joint cool undisturbed |
| Trimming overlap too short | Moisture tracking at tube edge | Keep at least 25 mm overlap on the jacket |
Each of these failures is preventable, and most are caught with a visual inspection after the job: uniform contact around the full circumference, no visible gaps or bubbling, and, on adhesive-lined tubes, a smooth fillet visible at both open ends.
Standards, Compliance, and Geographic Requirements
Industrial buyers do not buy heat shrink tubes on looks alone. In the United States and Canada, maintenance departments and OEMs specify tubing recognized under UL 224 and CSA standards; across the European Union and the United Kingdom, CE-marked, RoHS-compliant, and REACH-compliant grades are expected; and international projects frequently call out IEC references and flame-retardant, low-smoke performance. For customers in the Middle East, Australia, and Southeast Asia, documentation for these requirements is part of the purchasing decision, because a failed batch of tubing discovered after installation costs far more than the tubing itself.
Working with a manufacturer that maintains these certifications on its standard production, as WILLELE does, removes a layer of risk from the procurement process. Compliance paperwork accompanies the shipment, and engineering support is available to match tube diameter, shrink ratio, and material grade to the specific maintenance application before a bulk order is placed.
Why B2B Buyers Choose WILLELE Electric
WILLELE Electric manufactures heat shrink tubes specifically for industrial and OEM buyers who need consistent quality across large production runs, not one-off retail packs. Production covers polyolefin, PVC, fluoropolymer, and dual-wall adhesive-lined constructions, tested to UL 224, RoHS, and REACH requirements, with documentation available for procurement and quality teams. Ready-to-ship inventory and streamlined logistics support customers across North America, Europe, the Middle East, and Asia-Pacific who need dependable lead times for maintenance programs, panel building, and renewable energy projects. For engineering teams working from a bill of materials or a sample connector, WILLELE’s technical team matches tube size, shrink ratio, and material grade to the application before any volume order, reducing the risk of a mismatched specification reaching the shop floor.
Frequently Asked Questions
What shrink ratio should I choose for an industrial cable splice? A 2:1 ratio covers most standard splices where the connector diameter is close to the cable’s finished diameter. For crimped lugs or connectors with a noticeably larger profile than the cable, a 3:1 or 4:1 ratio accommodates the size difference without a custom-cut tube.
Is dual-wall heat shrink tubing necessary for indoor panels? Not usually. Indoor, climate-controlled panels rarely face the moisture exposure that justifies the added cost of adhesive-lined tubing, so single-wall polyolefin is typically adequate unless the panel sits in a washdown or high-humidity area.
What temperature is required to properly shrink industrial-grade tubing? Most polyolefin tubing recovers fully between 90°C and 120°C, applied with a heat gun set for even, moving heat rather than a fixed hot spot. Fluoropolymer grades may require higher recovery temperatures, so check the manufacturer’s datasheet before installation.
How can I verify a heat shrink connection was installed correctly? Inspect for uniform contact around the entire circumference with no visible gaps or bubbling, and on adhesive-lined tubes, confirm a smooth adhesive fillet at both open ends. A gentle pull test and, for energized circuits, a thermal imaging check confirm both mechanical and electrical integrity.
Can heat shrink tubes be removed and reused? No. Shrinking is a one-way process; the cross-linked polymer does not re-expand. Removal requires cutting the tube off, and any repair should use fresh tubing sized for the joint.
How do heat shrink tubes compare to electrical tape for maintenance repairs? Tape offers quick, temporary protection but can unwind, trap moisture, and leave gaps over time. Heat shrink tubing provides a permanent, uniform, sealed covering that grips the joint, which is why plant maintenance standards increasingly mandate it for splices and terminations while tape is reserved for temporary or low-risk bundling.
WILLELE Electric is a B2B manufacturer specializing in heat shrink tubes and electrical wiring accessories for industrial, renewable energy, and OEM applications worldwide. Visit willele.com for technical datasheets, sample requests, and bulk ordering support.